How to Test Hardness of Ceramic Materials?

Ceramic materials, especially technical ceramics, are used in various applications where their mechanical strength and resistance to external forces, such as corrosion, are major functional requirements. For instance, these ceramics are often used for coating other materials to ensure high wear and temperature resistance. They’re also used in isolators, bearings, capacitors, and pumps or powder-coated metal surfaces. Other important mechanical features that account for the application of ceramics in these areas include high hardness, high elastic modulus, and low fracture toughness. So to ensure that these ceramics perform well in specific applications, we typically perform a hardness test on them. This will help prove the mechanical integrity of the workpiece produced with the ceramics. Generally, the Vickers and Knoop methods are widely applied for hardness tests of ceramics. Vickers technique is most common, while Knoop hardness tests may also be applied to test the hardness of ceramic-coated layers, as it has minor crack formation and a small indentation depth.
What is the Hardness of Ceramics?
Hardness is one of the most important and most frequently measured properties in ceramics. It can be defined as the measure of the yield stress of any ceramic or material. Hardness characterizes the resistance of ceramics to fracture, deformation, densification, and displacement. This process can be challenging, but conventionally, the hardness of ceramics is measured using the Knoop or the Vickers diamond indenters. An indenter is used in this process.

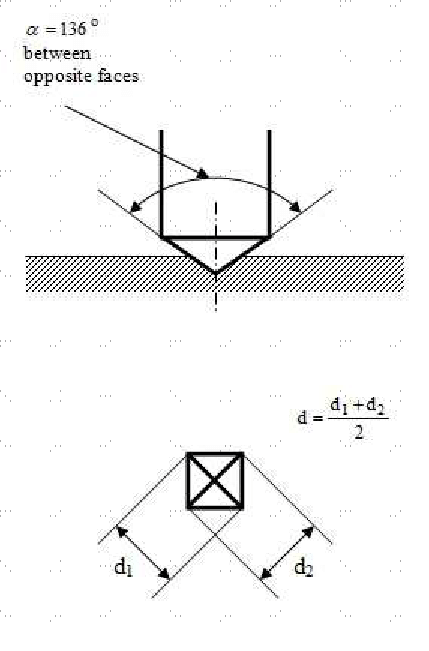
Vickers Hardness Test Source: www.researchgate.net
Is Hardness the Same as Wear Resistance?
Wear resistance describes the ability of a material to resist material loss by mechanical action. For example, the thread on tires begins to wear after repeated prolonged use. Note that a material can be wear-resistant and tough, but not hard per se. A hard material, too, can be wear-resistant but not particularly tough. Toughness, in this case, refers to the material’s ability to absorb energy or undergo deformation or mechanical stress without getting fractured or permanent deformation. Tires, like ceramics, can be pretty wear-resistant, but that doesn’t make them hard. They are only tough because even if a tire becomes permanently deformed, it rarely tears or fractures. Ceramics are also wear-resistant, with fine ceramics being more resistant to chemical and abrasive wear than other ceramics. Wear resistance testing of ceramic materials measures the abrasion behavior/resistance of ceramics. Hardness, in general, refers to a material's ability to withstand or resist permanent deformation. If a material is able to resist indentation, scratching, bending, or cutting, we can say it has good hardness quality. Typically, the higher the yield stress of the ceramic, the more prone the material is to crack under the indenter. Hardness is more or less the response of a material to the condition being tested. For instance, fine-grained materials are typically harder than coarse-grained ones with the same composition. This is because the coarse-grained, unlike the fine-grain varieties, are more prone to the local shattering of grains.
The Hardness of Fine-grained Ceramics
Note that metals are resistant to plastic deformation when subjected to mechanical stress. However, they leave an imprint after the indenter must have been removed. This even makes it easy to measure deformation or hardness in metals. Ceramics, on the other hand, will not deform physically, making the hardness test of ceramics a bit trickier than you would expect. Fine-grained ceramics are harder than other kinds of ceramics. In fact, they’re often called super ceramics because of their ability to withstand extreme stress in differentiation conditions. For example, alumina — a common ceramic — is almost three times as hard as stainless steel. Silicon carbide, another very important ceramic, has a hardness value of about four times that of stainless steel.
Hardness Testing Methods for Ceramics
As mentioned earlier in the article, there are two very common hardness testing methods — the Vickers and the Knoop methods. There are less common options, such as Brunel and Rockwell, using slightly different refinements. Regardless of the technique used, they are all based on the same idea of indentation. We can as well call them indentation hardness tests. Broadly, these techniques are classified into three categories: macro, micro, and nano-indentation, with the length of penetration being measured in millimeters, micrometers, and nanometers, respectively. The indentation hardness test specifically measures the resistance of ceramics to plastic deformation. Plastic deformation refers to a permanent change in the shape of a material due to mechanical stress.
Vickers Hardness Test
The Vickers hardness test is performed to measure the hardness of ceramics or other materials by measuring the size of the indentation left by the indenter. It works well for small parts and thin sections. It uses a diamond indenter and a light load to produce an indentation on the material being tested. The hardness value can also be the measure of the depth of indentation caused by the indent.
Knoop Hardness Test
The Knoop hardness test is a micro-hardness test for measuring the hardness of very brittle material and thin sheets. Typically, a small indentation is used for testing purposes. A diamond tip, which is pressed into the surface of the ceramic, is used to cause the indentation, and the size of the indentation is measured using a light microscope with a measuring device.
Conclusion
Ceramics are used in several applications, such as in machining tools for cutting metals, and for making kitchenware and jewelry. Hardness testing of ceramics is done to check the mechanical strength of ceramics used in these applications. Whether we use the Vickers or Knoop hardness test methods, the size or depth of indentation caused by an indenter (typically diamond material) on the material being tested is measured as the hardness value of the material. For more information about ceramic materials, please visit https://www.preciseceramic.com/.
{{item.content}}
LEVE A REPLY
{{item.children[0].content}}
{{item.content}}
LEAVE A REPLY
SUBSCRIBE OUR NEWSLETTER
- How PBN Crucibles Ensure the Quality of GaN & SiC Epitaxial Materials
- SiC vs. Quartz Focus Rings: A Cost and Performance Analysis for Advanced Etch
- AlN Ceramic Substrates: Enabling Next-Gen Electrostatic Chucks
- The Amor of Semiconductor Tools: Why High-Purity Al2O3 & AlN Are Preferred for Plasma Process Chambers
- Silicon Carbide - Ultra-High Temperature Ceramics for Extreme Environments


